Are you battling frustrating electrical problems in your GM truck or SUV? Intermittent power windows, door locks with a mind of their own, a security light that won’t turn off, or a mysterious battery drain that leaves you stranded are all classic signs of a failing Body Control Module (BCM). As a technician with over two decades of experience, I’ve seen how a faulty BCM can turn a reliable vehicle into a source of constant headaches. This isn’t just an inconvenience; it affects your vehicle’s core functions and security.
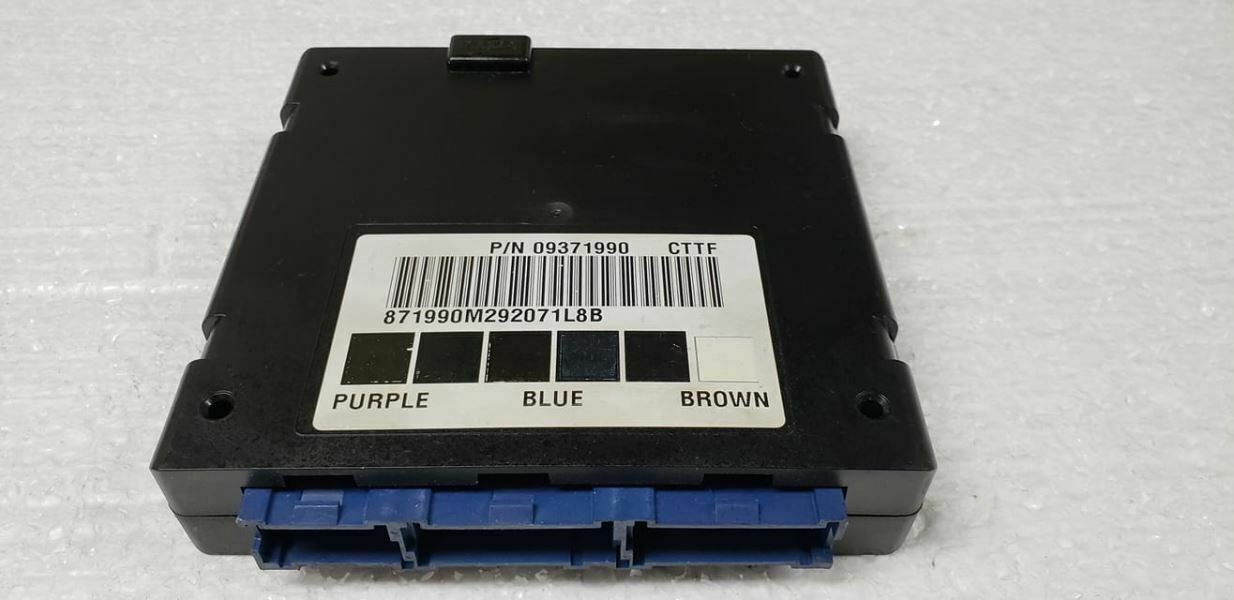
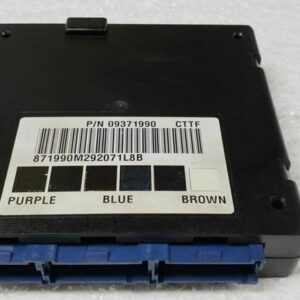
This is your direct-fit, permanent solution. We offer a replacement Body Control Module, part number 9385236, that arrives at your door pre-programmed to your vehicle’s specific VIN. Forget expensive dealership visits and the hassle of finding a shop with the right programming tools. We handle the complex part for you. Simply provide your VIN during checkout, and our experts will flash the module with the latest GM software updates, ensuring seamless communication with your truck’s other systems right out of the box.
Common Signs of a Failing BCM
If you’re experiencing any of the following, a faulty BCM is the likely culprit. Replacing it can restore full functionality to your vehicle.
- ✔ Erratic or non-functional power windows, door locks, and interior lights.
- ✔ The security or anti-theft light stays on, preventing the engine from starting.
- ✔ Instrument cluster gauges behaving strangely or not working at all.
- ✔ A persistent parasitic battery drain that kills your battery overnight (often caused by the BCM not ‘sleeping’).
- ✔ Horn honking unexpectedly or not working when pressed.
- ✔ Communication error codes like U0140 (Lost Communication With Body Control Module).
A Technician’s Notebook: The Phantom Battery Drain
I once had a 2000 Silverado 2500 in the bay with a classic phantom drain. The owner had replaced the battery twice and the alternator once, but every few days, it would be dead. After checking all the usual suspects, I hooked up an ammeter and started pulling fuses. The draw dropped significantly only when I pulled the BCM fuse. The internal circuits of the original BCM had failed, preventing it from entering its low-power sleep mode. It was constantly drawing power, draining the battery. A new, programmed BCM like this one solved the problem instantly, saving the customer from further guesswork and expensive parts.
A Straightforward Guide to Installation
Replacing the BCM is a manageable job for a DIY enthusiast. While the exact location can vary, it’s typically found under the driver’s side dashboard. Here is a general guide:
- Safety First: Disconnect the negative terminal from your vehicle’s battery to prevent any electrical shorts.
- Locate the BCM: On most full-size trucks and SUVs like the Yukon or Silverado, the BCM is located to the left of the steering column, often attached to a metal bracket. On S-series trucks, it may be in the center dash area.
- Remove Trim Panels: You will likely need to remove the lower dash panel (knee bolster) to gain access. This is usually held in by a few screws and clips.
- Unplug and Unbolt: Carefully disconnect the multiple color-coded electrical connectors from the old BCM. They have locking tabs that need to be depressed. Then, unbolt the module from its mounting bracket.
- Install the New Module: Mount your new, pre-programmed BCM in the same location and securely reconnect all electrical connectors. Ensure they click into place.
- Reconnect and Test: Reconnect the negative battery terminal. Turn the key to the ‘On’ position and test your lights, locks, windows, and other accessories to confirm proper operation.
Important Post-Installation Notes
In some cases, additional synchronization procedures may be needed:
- ✔ Airbag System Sync: If your airbag warning light is illuminated after installation, a ‘Setup SDM Primary Key in BCM’ procedure is required. This syncs the new BCM with the airbag system and must be done with a professional-grade scan tool.
- ✔ Brake Pedal Position Relearn: Some models may require a brake pedal position sensor recalibration to ensure brake lights and traction control function correctly.
Disclaimer: Vehicle systems vary. Always consult a factory service manual or a qualified professional if you are unsure about any step.
Verified Vehicle Compatibility
This module is a direct replacement for part numbers 9385236, 19208539, and 9371990. It is guaranteed to fit the following models and options:
- 2001 ASTRO (LH dash)
- 2001 BLAZER S10/JIMMY S15 (center dash, ID 9385236)
- 2001 BRAVADA (center dash)
- 2001 S10/S15/SONOMA (center dash)
- 2001 SAFARI (GMC) (LH dash)
- 2000 SIERRA 1500 PICKUP (LH dash, ID 9371990 or 9385236)
- 2000 SIERRA 2500 PICKUP (LH dash, ID 9385236)
- 2000 SILVERADO 1500 PICKUP (LH dash, ID 9371990 or 9385236)
- 2000 SILVERADO 2500 PICKUP (LH dash, ID 9385236)
- 2000 SUBURBAN 1500 (LH dash, ID 9385236)
- 2000 SUBURBAN 2500 (LH dash, ID 9385236)
- 2000 TAHOE (LH dash, ID 9385236)
- 2000 YUKON (exc. Denali, LH dash, ID 9385236)
- 2000 YUKON XL 1500 (LH dash, ID 9385236)
- 2000 YUKON XL 2500 (LH dash, ID 9385236)
Frequently Asked Questions
Frequently Asked Questions
Why do you need my VIN?
Your Vehicle Identification Number (VIN) is essential for us to program the BCM with the correct software and vehicle-specific options. This ensures it works seamlessly with your truck’s systems, just like the original part from the factory.
Is this a simple plug-and-play installation?
Yes, because we program the module before shipping, the physical installation is plug-and-play. You simply swap the old module with this new one. In some rare cases, minor relearn procedures may be needed post-installation as noted above.
Do I need to return my old BCM?
No, there is no core charge for this part. You can keep your original module, saving you the time and expense of a core return.
Will this fix my ‘Service 4WD’ light?
While the BCM communicates with many systems, a ‘Service 4WD’ message is typically related to the Transfer Case Control Module (TCCM) or related components like the encoder motor or front axle actuator, not the BCM.
What tools are required for the installation?
Basic hand tools are all that’s needed for the physical swap: typically a socket set and a trim removal tool to safely pry off the dash panels without causing damage.