

If you’re dealing with frustrating and unpredictable engine problems in your Chevrolet, you’ve come to the right place. As a technician with over two decades of experience under the hood, I’ve seen firsthand how a failing Engine Control Module (ECM) can turn a reliable car into a source of constant headaches. From a persistent Check Engine Light to a car that refuses to start, the ECM is the brain of your engine, and when it falters, everything else follows. This isn’t just a part; it’s the solution to getting your vehicle’s performance and reliability back.
This isn’t a generic, one-size-fits-all module. This is a direct-fit ECM for your vehicle, and we handle the most critical step for you: programming. Before we ship it, we will flash the unit with the very latest GM-certified software, specifically matched to your vehicle using the VIN you provide at checkout. This means you get a part that is truly plug-and-play, saving you from a costly trip to the dealership and the hassle of specialized programming tools. It’s the same quality fix I’d perform in my own service bay.
Is Your Vehicle Showing These Symptoms?
A faulty ECM can manifest in numerous ways, often mimicking other sensor failures. In my shop, I always check for these classic signs of a computer issue before replacing expensive sensors. If your car is experiencing any of the following, a failing ECM is a likely culprit:
- ✔ Persistent Check Engine Light (CEL) that won’t clear
- ✔ Engine stalling, stumbling, or misfiring for no apparent reason
- ✔ Complete no-start condition where the engine cranks but won’t fire up
- ✔ Noticeable decrease in fuel economy
- ✔ Poor or erratic automatic transmission shifting
- ✔ Communication error codes, such as U0100 (Lost Communication with ECM/PCM)
- ✔ Internal processor failure codes, most commonly P0601, P0603, or P0606
From the Diagnostic Bay: A Tricky Diagnosis
I remember a 2012 Chevy Cruze that came in with an intermittent no-start and a laundry list of seemingly unrelated trouble codes. The owner had already replaced the crankshaft sensor and a coil pack with no success. The scanner would lose communication with the ECM sporadically. After verifying all power and ground circuits to the module were solid—a crucial first step—it was clear the ECM’s internal processor was failing under thermal stress. Once it warmed up, it would quit. We installed a pre-programmed ECM, just like this one, and the car fired up instantly and has run flawlessly since. This case highlights why jumping to conclusions can be costly; sometimes, the problem is the computer itself.
Your Solution: The 2012 Sonic ECM
This Engine Control Module is your path to a lasting repair. By providing a component that’s already flashed with your vehicle’s specific software, we eliminate the biggest hurdle in ECM replacement. You are getting a reliable part that restores factory performance and communication, allowing all other vehicle systems to function as they were designed to.
A Straightforward Guide to Installation
Replacing the ECM on these models is a job most DIYers can handle with basic tools. Follow these steps for a successful installation:
- Safety First: Disconnect the negative terminal from your vehicle’s battery and secure it away from the post to prevent accidental reconnection.
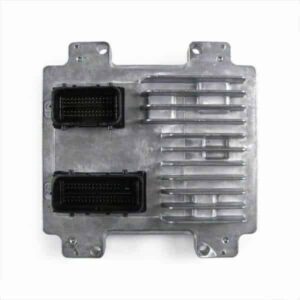
- Locate the ECM: On most of these models, the ECM is located in the engine bay, often near the battery or firewall. It’s a silver metal box with several large electrical connectors.
- Disconnect the Connectors: Carefully release the locking tabs on each electrical harness connector and pull them straight out from the module. Avoid pulling on the wires themselves.
- Remove the Old Module: Unbolt the old ECM from its mounting bracket. There are typically a few 10mm bolts holding it in place.
- Install the New Module: Mount your new, pre-programmed ECM onto the bracket and secure it with the bolts.
- Reconnect Everything: Firmly plug the electrical connectors back into the new ECM until they click into place. Reconnect the negative battery terminal.
- Final Step: Some vehicles may require a security relearn procedure, which can often be done without special tools. A common method is to turn the key to the ‘ON’ position for 10-15 minutes, then ‘OFF’ for 10 seconds, and repeat two more times before starting the engine. Consult your vehicle’s specific procedure if needed.
Verified Vehicle Compatibility
This module is a direct replacement for part number 12636386 and is also compatible with part numbers 12679199, 12642927, 12621466, and 12630789. It is guaranteed to fit the following models:
- ✔ 2012 Chevrolet Sonic (1.8L)
- ✔ 2011-2012 Chevrolet Cruze (1.8L)
- ✔ 2009-2011 Chevrolet Aveo
- ✔ 2013 Chevrolet Spark
- ✔ 2013-2014 Chevrolet Trax (1.8L)
- ✔ 2009-2010 Pontiac Wave
- ✔ 2009-2010 Pontiac G3