
Is Your Vehicle’s Brain on the Fritz?
If you’re dealing with a persistent check engine light, erratic engine behavior, or even a no-start condition in your GM vehicle, the problem might be deeper than a simple sensor. The Engine Control Module (ECM) is the central computer of your vehicle, managing everything from fuel injection and ignition timing to transmission shifts and emissions. When it fails, it can cause a cascade of frustrating and hard-to-diagnose issues. You’re not just buying a part; you’re restoring the heart of your car’s operational intelligence.
From the Shop Floor: A Real-World Diagnostic Story
“A customer brought in his 2012 Impala last month, completely fed up. He’d replaced two oxygen sensors and a MAF sensor trying to clear a lean condition code, but the check engine light always came back. After hooking up my diagnostic scanner and monitoring the live data, I noticed the fuel trim commands from the ECM were completely irrational—they weren’t responding to sensor inputs correctly. The issue wasn’t the sensors; it was the ECM itself. The internal driver circuits had failed. We installed a VIN-programmed module just like this one, and the car ran perfectly. It’s a classic case I’ve seen dozens of times where chasing symptoms costs more than fixing the root cause.”
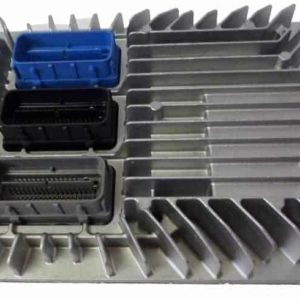
The Direct Solution: A 2010 Allure Engine Module Programmed for You
This isn’t just a replacement part; it’s a complete, ready-to-install solution. We take a genuine OEM ECM and flash it with the latest GM-certified software specifically for your vehicle. By providing your Vehicle Identification Number (VIN) at checkout, you ensure that the module you receive is perfectly matched to your car’s specific configuration, options, and security protocols. This eliminates the need for an expensive trip to the dealership for programming.
Symptoms of a Failing ECM:
- ✔ Persistent Check Engine Light (CEL) with codes like P0601, P0606, or other communication errors.
- ✔ Engine stalling, stumbling, or misfiring for no apparent reason.
- ✔ Noticeable decrease in fuel economy.
- ✔ Harsh or incorrect automatic transmission shifting.
- ✔ Complete no-start or intermittent starting problems.
- ✔ Failure of one or more fuel injectors or ignition coils to fire.
Plug-and-Play Installation: No Dealer Visit Required
You can get your vehicle back on the road without specialized tools or a trip to the dealer. Follow these simple steps to install your new ECM.
- Safety First: Always disconnect the negative terminal from your vehicle’s battery before starting any electrical work.
- Locate the Old ECM: On most compatible models like the Buick Allure, Chevy Equinox, or GMC Terrain, the ECM is found in the engine compartment on the driver’s side (LH side), often near the air filter housing or firewall. For Cadillac CTS models, it’s typically on the passenger (RH) side.
- Disconnect the Connectors: Carefully release the locking tabs on the wiring harness connectors and pull them straight out from the module. Never force them. Inspect the connector pins for any corrosion or damage.
- Remove the Old Module: Unbolt the old ECM from its mounting bracket.
- Install the New Module: Bolt your new, pre-programmed ECM into place. Reconnect the wiring harnesses, ensuring they click securely into position.
- Reconnect the Battery: Re-attach the negative battery terminal.
- Perform Key Cycle: Turn the key to the ‘ON’ position (without starting the engine) for 10-15 seconds, then turn it ‘OFF’. Repeat this 2-3 times to allow the vehicle’s systems to recognize the new module before starting the engine. Your vehicle is now ready to drive!
Guaranteed Compatibility
This module is a direct replacement for part numbers 12616889, 12630908, 12637106, 12642665, 12650256, and 12651993. It fits a wide range of GM vehicles, including the Buick LaCrosse, Cadillac SRX, Chevy Camaro, and many more. Please verify your vehicle in the fitment list to ensure a perfect match.