
Tired of Electrical Gremlins in Your Cadillac?
As a technician with over two decades of experience, I’ve seen it all. A customer comes in with a 2011 CTS, and the symptoms are all over the place: the radio cuts out, the interior lights flicker like a horror movie, and the security light is always on. They’ve replaced the battery and checked the fuses, but the problems persist. Nine times out of ten, the culprit is a failing Body Control Module (BCM). It’s the central nervous system for your vehicle’s comfort and convenience features, and when it goes, it can cause chaos. This isn’t just an annoyance; a faulty BCM can affect everything from your power locks to your exterior lighting, creating a real safety issue.
This isn’t just a replacement part; it’s a complete, hassle-free solution. We take a reliable Body Control Module and program it with the latest GM software updates specifically for your vehicle’s VIN. This means you skip the expensive trip to the dealership for programming. You get a part that’s ready to install right out of the box, designed to restore the functionality you’ve been missing. This is the definitive fix for those frustrating electrical issues and a direct replacement for part number 95151084 and many others.
From the Diagnostic Bay: A Tricky Diagnosis
I remember a 2012 Cadillac CTS that was brought to my shop with a no-start condition that had stumped two other mechanics. The starter was fine, the battery was new, but the car was dead. After hooking up my scan tool, I saw a flurry of communication errors, specifically a U0140 code—Lost Communication With Body Control Module. The BCM wasn’t just failing to operate the windows; it was preventing the entire vehicle network from communicating correctly, which disabled the anti-theft system and prevented the engine from starting. By installing a VIN-programmed BCM like this one, we had the car running perfectly in under an hour, saving the customer from what they thought would be a massive, multi-day repair bill.
Common Signs of a Failing GM BCM
If your vehicle is acting up, a failing BCM could be the reason. Here are some of the most common symptoms I’ve diagnosed in my shop, often accompanied by communication codes like U0140, U0155, or B-series codes related to body electronics.
- ✔ Erratic or non-functional interior and exterior lights.
- ✔ Power windows, door locks, or mirrors working intermittently or not at all.
- ✔ The security system light stays on, or the alarm goes off randomly.
- ✔ The radio or instrument cluster display powers off and on unexpectedly.
- ✔ A no-start condition where the engine doesn’t crank.
- ✔ False warning messages on the driver information center (DIC).
A Straightforward Guide to Your BCM Installation
Installing your new 2008-2013 CTS Body Control Module is a manageable job for a confident DIYer. The BCM on the CTS is typically located on the left (driver’s) side of the dash. Always consult a service manual for your specific vehicle’s location and torque specs.
- Safety First: Disconnect the negative terminal from your vehicle’s battery and wait a few minutes to ensure all systems are powered down.
- Access the Module: You will likely need to remove the lower dash panel or knee bolster beneath the steering column to gain access to the BCM.
- Disconnect and Remove: Carefully unplug the electrical connectors from the old BCM. They have locking tabs that need to be depressed. Once disconnected, unbolt the module from its mounting bracket and remove it.
- Install the New BCM: Mount the new, pre-programmed BCM in place of the old one and securely fasten it. Reconnect all electrical connectors, ensuring they click firmly into place.
- Reconnect and Test: Reinstall any panels you removed and reconnect the negative battery terminal. Start the vehicle and test all functions: lights, windows, locks, radio, etc.
Post-Installation Note: In some cases, additional steps may be needed. If your airbag light is on, a professional scan tool is required for the ‘Setup SDM Primary Key’ procedure. Similarly, a ‘Brake Pedal Position Relearn’ may be necessary. These are not always required but are important to be aware of.
Verified Vehicle Compatibility
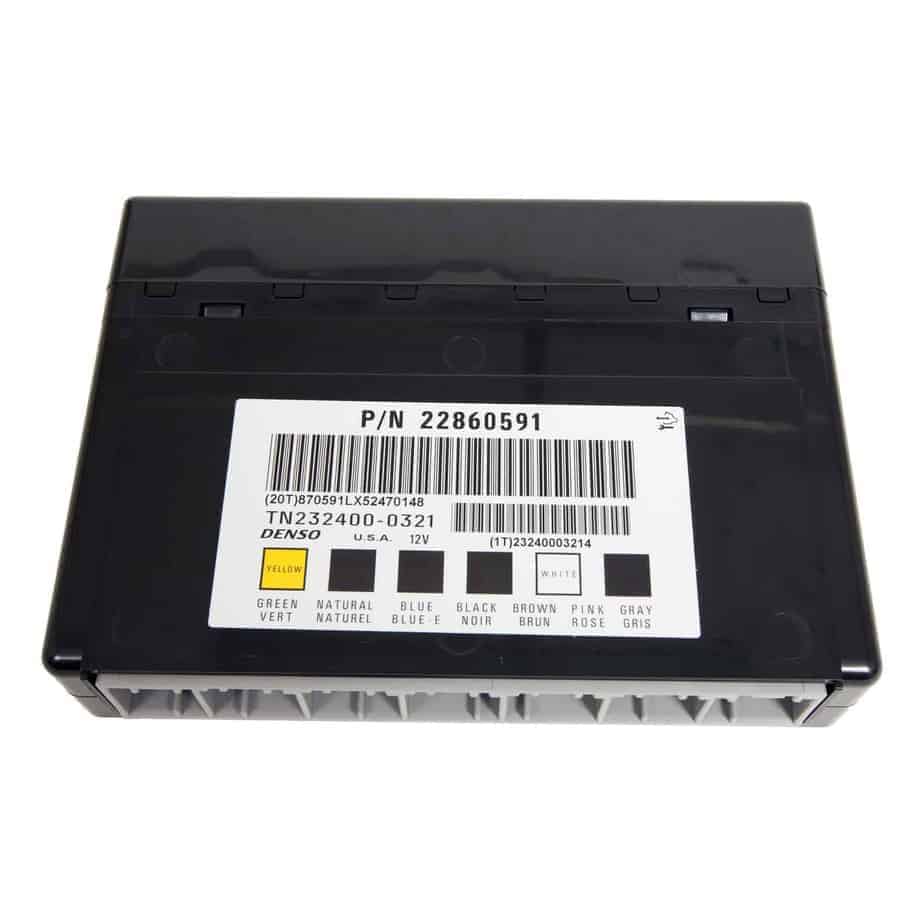
This module is a direct replacement for a wide range of GM vehicles and part numbers. Please verify your original part number is on this list before ordering. This unit is compatible with part numbers: 10382479, 15093910, 15276271, 15299986, 15819552, 15828601, 15837419, 15872388, 15872421, 15880684, 15921352, 15921353, 15948438, 15948439, 20815898, 20839063, 20864767, 20864768, 20921435, 20921436, 20935349, 22860591, 25826124, 25826125, 25847588, 25847589, 25892622, 25910474, 25934762, 25934763, and 95151084.
Frequently Asked Questions
Do I need to do any programming myself?
No. We program the module to the VIN you provide during checkout. It arrives ready for installation, saving you a trip to the dealer.
Is there a core charge or do I have to send my old part back?
There is absolutely no core charge. You can keep your original module.
What tools are needed for the installation?
Basic hand tools like a socket set and screwdrivers are usually all that’s required to access and replace the BCM. No special programming tools are needed for the initial installation.
What if my airbag light comes on after installation?
This is uncommon, but if it happens, the BCM and the Sensing and Diagnostic Module (SDM) need to be synced. This procedure, called ‘Setup SDM Primary Key in BCM,’ requires a professional-grade scan tool.
Will this fix my specific problem?
This module is designed to fix issues caused by a faulty BCM. While it resolves the vast majority of related electrical problems, always ensure your vehicle has been properly diagnosed by a professional or that you’ve ruled out other causes like wiring or grounds.