

Restore Your Vehicle’s Performance and Reliability
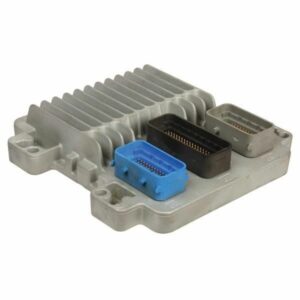
Is your 2005 GTO, Corvette, or GM truck feeling sluggish, stalling unexpectedly, or showing a persistent Check Engine Light? The Engine Control Module (ECM) is the electronic brain of your vehicle, managing everything from fuel mixture and ignition timing to transmission shifting. When it starts to fail, it can cause a wide range of frustrating and hard-to-diagnose problems. After 20 years in the shop, I’ve seen firsthand how a failing ECM can sideline an otherwise perfectly good vehicle. This isn’t just a part; it’s the solution to getting your vehicle’s performance and drivability back to factory standards.
This isn’t a generic, one-size-fits-all component. We take the guesswork and hassle out of the replacement process. Simply provide your vehicle’s VIN after purchase, and we will program this module with the latest, most stable software updates directly from GM. This ensures perfect compatibility and function for your specific vehicle. This critical step means you receive a part that is ready for installation right out of the box, saving you a costly trip to the dealership for programming.
Is Your Vehicle Showing These Signs of ECM Failure?
A faulty ECM can manifest in various ways. If you’re experiencing any of the following, a failing engine computer could be the culprit. Look out for these common indicators:
- ✔ Persistent Check Engine Light (CEL) that won’t clear.
- ✔ Diagnostic Trouble Codes (DTCs) such as P0601 (Internal Control Module Memory Check Sum Error), P0606 (ECM/PCM Processor Fault), or communication errors.
- ✔ Engine stalling, stumbling, or running rough for no apparent reason.
- ✔ A no-start condition where the engine cranks but won’t fire up.
- ✔ Noticeable decrease in fuel economy.
- ✔ Issues with automatic transmission shifting, such as harsh or delayed shifts.
- ✔ Intermittent electrical problems that seem to have no other source.
Case Study: A Tricky Diagnosis
A customer brought in a 2005 SSR with an intermittent no-start condition. They had already replaced the battery, alternator, and starter. The truck would crank fine but wouldn’t fire, and there were no consistent trouble codes. After checking fuel pressure and spark, which were sometimes present and sometimes not, I focused on the ECM. By monitoring the 5-volt reference signal from the module to various sensors, I noticed it was dropping out randomly. This pointed directly to an internal failure in the ECM. We installed a pre-programmed module, and the truck fired up on the first try and has run perfectly ever since. It’s a classic example of how a faulty ECM can create ghost-like issues that are impossible to trace to a single sensor.
Straightforward Installation Guide for Your GM Vehicle
Installing your new 2005 GTO Engine Control Module is a manageable job for a DIY enthusiast. Following these steps will ensure a smooth process. Always consult a vehicle-specific repair manual if you are unsure about any step.
- Safety First: Disconnect the negative terminal from your vehicle’s battery to prevent any electrical shorts.
- Locate the ECM: The location varies by model. On a 2005 GTO, it’s on the driver’s side of the engine bay. On a Corvette, it’s in the passenger-side engine compartment. For trucks and SUVs like the Trailblazer or Envoy, it’s typically on the driver’s side of the engine block. On the SSR, it’s next to the air box.
- Disconnect Connectors: Carefully release the locking tabs and disconnect all electrical wiring harnesses from the old ECM. Do not force them; they often have a lever or slide-lock mechanism.
- Remove the Old Module: Unbolt the old ECM from its mounting bracket. Keep the mounting hardware, as you will need it to install the new part.
- Install the New ECM: Mount your new, pre-programmed ECM onto the bracket and secure it with the original hardware.
- Reconnect Everything: Firmly plug the wiring harnesses back into the new module until they click into place. Reconnect the negative battery terminal.
- Final Step: In some cases, a security relearn procedure may be necessary. This can typically be done without special tools by cycling the key in the ignition. Turn the key to the ‘ON’ position for 10-15 minutes, then ‘OFF’ for 10 seconds, and repeat two more times. After this, the vehicle should start.
Verified Fitment Across Multiple GM Models
This engine control module is a direct-fit replacement for a wide range of 2005 GM vehicles. It is compatible with service part numbers 12578554, 12596771, 12597191, 12597883, and 19210071. Please verify your vehicle is on the list below:
- ✔ 2005 Buick Rainier: 5.3L (LH engine)
- ✔ 2005 Chevrolet Corvette: (RH engine compartment)
- ✔ 2005 Chevrolet SSR: (next to air box)
- ✔ 2005 Chevrolet Trailblazer EXT: 5.3L (LH engine)
- ✔ 2005 GMC Envoy / Envoy XL / Envoy XUV: 5.3L (LH engine)
- ✔ 2005 Isuzu Ascender: 5.3L (LH engine)
- ✔ 2005 Pontiac GTO: Main (LH engine)
- ✔ 2005 Saab 9-7X: 8 cylinder (LH engine)
By purchasing this pre-programmed 2005 GTO Engine Control Module, you are choosing a reliable, cost-effective solution to restore your vehicle’s brainpower and get you back on the road with confidence.
Frequently Asked Questions
Do I need to do any programming myself?
No. This module comes fully programmed to your vehicle’s specific VIN. We handle all the flashing with the latest GM software before it ships. It is designed to be a plug-and-play solution, though a security relearn may be required, which you can do at home.
Where do I provide my VIN?
After you complete your purchase, you will need to send us a message with your 17-digit Vehicle Identification Number (VIN). We cannot program and ship the module without it.
Is this a direct replacement for my original part?
Yes, this part is a direct replacement for original equipment service numbers 12578554, 12596771, 12597191, 12597883, and 19210071. It will fit and function just like the original.
What if my part number is not listed but my vehicle is?
If your vehicle is listed in our fitment guide, this module is the correct replacement, even if your original part number differs. GM often consolidates multiple part numbers into a single, updated service number.
What tools do I need for installation?
For most vehicles, you will only need basic hand tools, such as a socket set and ratchet, to remove the mounting bolts and disconnect the battery. No special diagnostic or programming tools are required.