Restore Command of Your Truck’s Electronics
Are you chasing down frustrating electrical gremlins in your GM truck or van? Flickering lights, power windows with a mind of their own, or a security light that won’t turn off are classic signs of a failing Body Control Module (BCM). As the central nervous system for your vehicle’s comfort and convenience features, a faulty BCM can make your daily drive a nightmare. I’ve seen it countless times in the shop: a perfectly good engine and transmission sidelined by what seems like a haunted electrical system. The solution isn’t guesswork; it’s replacing the component at the heart of the problem.
This isn’t just a replacement part; it’s a complete solution. We take the guesswork and extra expense out of the equation by pre-programming this BCM with the latest GM software, specifically matched to your vehicle’s VIN. This means you get a module that recognizes all the specific options your truck came with from the factory. Forget about paying dealership programming fees or towing your vehicle for a simple module swap. We handle the critical software flashing before it even ships, getting you closer to a reliable fix, faster.
Case Study: A Tricky Diagnosis
A customer brought in his 2002 Silverado 2500 last month with a bizarre list of complaints: the radio would shut off randomly, the dome light would stay on, and the horn would chirp when he used the turn signal. He had already replaced the battery and checked all the fuses. After connecting my scan tool, I noticed a slew of communication fault codes pointing to the BCM. These modules, especially on the GMT800 platform, are notorious for internal solder joint failures after 20+ years of heat cycles. We installed one of our VIN-programmed BCMs, performed the quick post-install procedures, and every single one of his electrical issues was resolved. It’s a fix that restores the vehicle’s core functionality and the owner’s peace of mind.
Is Your GM Truck Showing These Signs?
- ✔ Erratic or non-functional power windows, door locks, or mirrors.
- ✔ Interior or exterior lights that flicker, stay on, or don’t work at all.
- ✔ The security or anti-theft light is illuminated, causing a no-start condition.
- ✔ The horn sounds at random or doesn’t work when commanded.
- ✔ Intermittent issues with the radio or instrument cluster displays.
- ✔ Diagnostic trouble codes (DTCs) related to communication or body circuits.
A Straightforward Guide to BCM Installation
Replacing the BCM is a manageable job for a DIY enthusiast. While the exact location varies slightly, the process is similar across these GM models. This guide is for the 2002 Sierra BCM and related platforms where it is located under the steering column.
- Safety First: Always disconnect the negative terminal from your vehicle’s battery and wait a few minutes before starting work.
- Locate the BCM: On most trucks and SUVs listed, the BCM is located under the driver’s side of the dashboard, often attached to a metal bracket near the steering column. You may need to remove a lower dash panel for access.
- Disconnect and Remove: Carefully unplug the multiple wiring harness connectors. They have locking tabs that need to be depressed. Once disconnected, unbolt or unclip the old BCM from its mounting bracket and remove it.
- Install the New BCM: Mount your new, pre-programmed BCM in the same location and securely reconnect all the wiring harnesses. Ensure each connector clicks into place.
- Reconnect Battery: Re-attach the negative battery terminal.
- CRITICAL Post-Installation Steps: After installation, two procedures are often necessary. First, use a capable diagnostic scan tool to perform the ‘Setup SDM Primary Key in BCM’ function to clear the airbag light. Second, some vehicles may require a Brake Pedal Position Sensor recalibration to ensure proper brake light function and vehicle stability control performance.
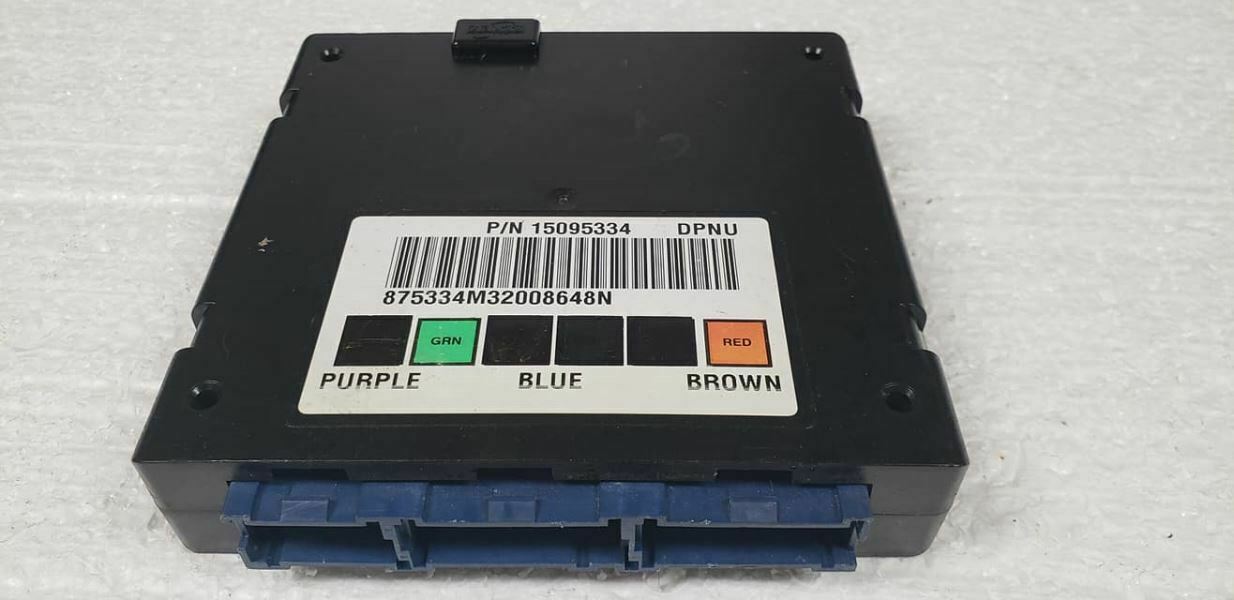
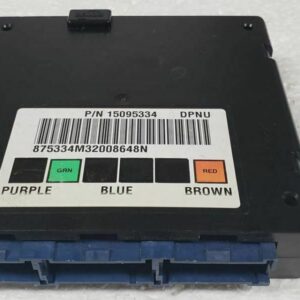
Verified Fitment For These GM Models
This module is a direct replacement for part numbers 15063578, 15081796, 15095334, 19208537, DKAK, and DPNU. Please provide your VIN upon purchase to ensure correct programming for your specific vehicle. It is compatible with the following models:
- 2002 GMC Sierra 1500 / 2500 / 3500 / Denali
- 2002 Chevrolet Silverado 1500 / 2500 / 3500
- 2002 Chevrolet Avalanche 1500 (4×2)
- 2002 Chevrolet Suburban 1500/2500 (4×2)
- 2002 Chevrolet Tahoe (4×2)
- 2002 Cadillac Escalade (4×2)
- 2002 GMC Yukon & Yukon XL 1500/2500 (4×2)
- 2002-2005 Chevrolet Blazer S10 / GMC Jimmy S15
- 2002-2004 Chevrolet S10 / GMC Sonoma
- 2002-2005 Chevrolet Astro Van
- 2002-2005 GMC Safari Van
Frequently Asked Questions
Why do you need my VIN number?
Your Vehicle Identification Number (VIN) allows us to program the BCM with the exact software and vehicle-specific options (like power seats, keyless entry, etc.) that your truck or van was built with. This ensures seamless integration and prevents functionality issues.
Is this part truly plug-and-play?
It is ‘plug-and-program.’ The module is physically plug-in, but as with any modern vehicle electronics, post-installation procedures are often required. You will likely need to perform an airbag system reset and potentially a brake pedal relearn using a diagnostic tool to restore full functionality and clear warning lights.
Will this fix my ‘Security’ light and no-start problem?
In many cases, yes. The BCM is a core part of the GM Passlock/Passkey anti-theft system. A faulty BCM is a very common cause of a persistent security light and the resulting engine start prevention. Replacing it with a correctly programmed unit often resolves this issue.
What tools are required for the post-install procedures?
You will need a mid-level or professional diagnostic scan tool that has bidirectional control capabilities. Basic code readers cannot perform the ‘Setup SDM Primary Key’ or ‘Brake Pedal Position Sensor Relearn’ functions. Many independent repair shops have this equipment if you are not equipped for it.
Can I install this myself to save money?
Absolutely. The physical installation is straightforward for anyone comfortable working under a dashboard. The key is having access to the proper scan tool for the final steps or having a local mechanic you trust to complete them for you after you’ve installed the part.